 Pin It
 I first made this creepy creation at a last-minute Halloween party when I realized I'd forgotten to buy anything festive. Standing in my kitchen with cream cheese, leftover vegetables, and a desperate need to impress, I arranged them into a grinning skull on a platter. The moment my friend's kid's eyes lit up, I knew I'd stumbled onto something special—a recipe that's equal parts appetizer and art project, proof that the best party foods are the ones that make people smile before they even take a bite.
I'll never forget watching my nephew at a Halloween party carefully pick off the carrot teeth and arrange them on his own plate, narrating the whole thing like he was a mad scientist. That's when I realized this recipe does something magical—it turns a simple appetizer into an interactive experience where people feel like they're part of the creation.
Ingredients
- Cream cheese: The foundation of your spread, and you want it softened to room temperature so it mixes smooth and creamy. Cold cream cheese will be lumpy and frustrating—I learned this the hard way.
- Sour cream: This adds richness and a subtle tang that keeps the spread from feeling one-dimensional. It's the secret ingredient people taste but can't quite name.
- Garlic powder: Just a teaspoon transforms this from plain to genuinely crave-worthy. Don't skip it or use fresh garlic here—the powder stays distributed evenly.
- Lemon juice: Brightens everything up and prevents the spread from tasting heavy. Fresh lemon is worth the squeeze.
- Salt and pepper: Taste as you go. This is where your spread either sings or falls flat.
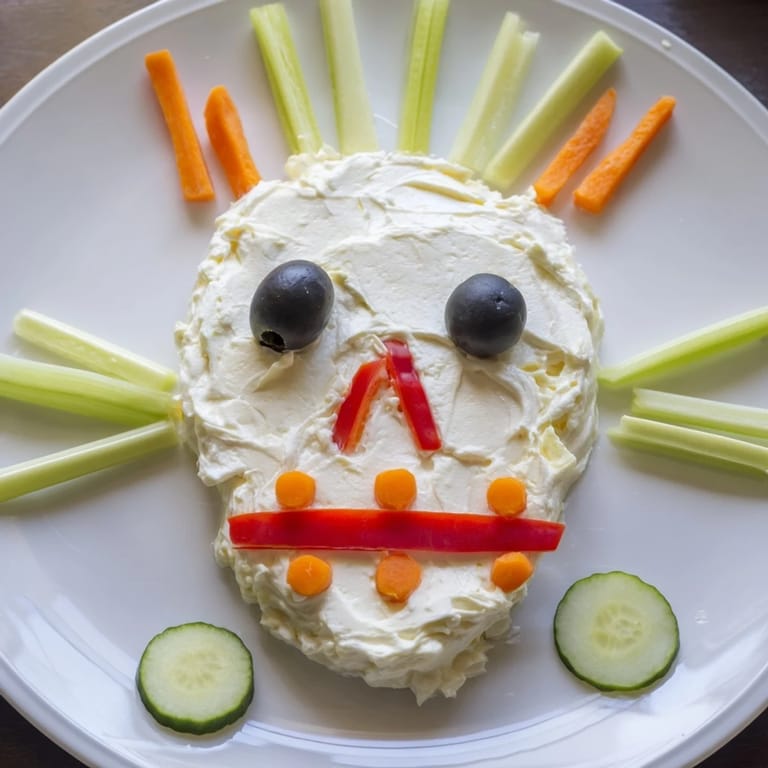
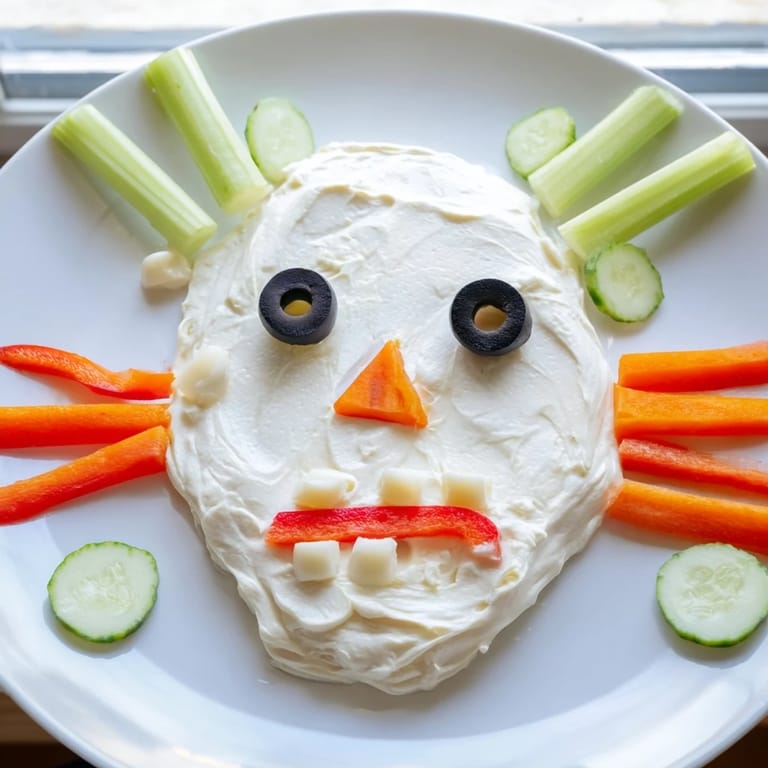
- Cucumber rounds: These add a pale, cool contrast that makes the skull look less one-dimensional. They're also wonderfully crisp.
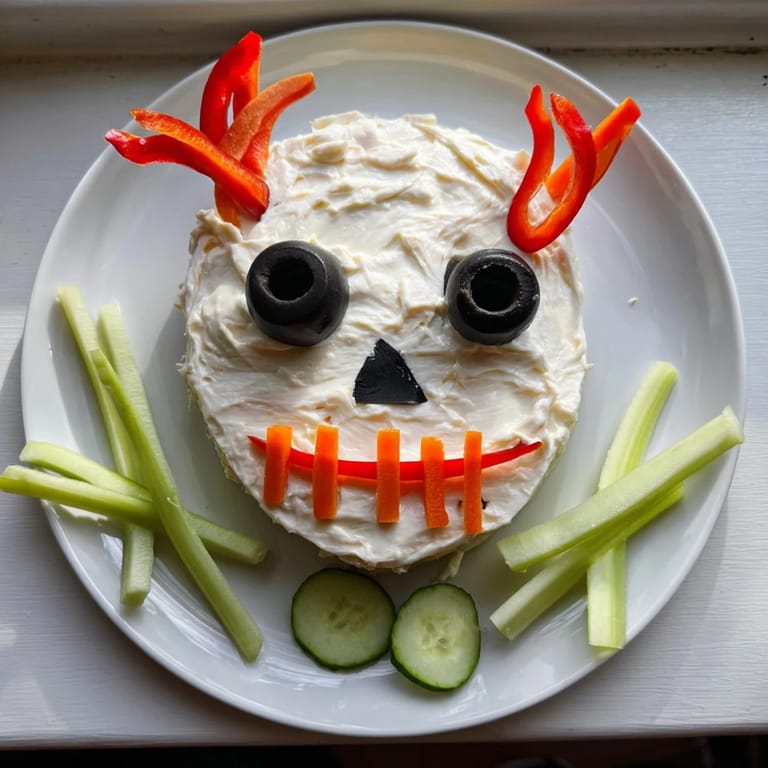
- Red bell pepper strips: The vibrant color is your friend here—these catch light and add drama to the mouth and cheekbones.
- Black olives: Perfect for haunting eyes. Halved ones sit naturally into the cream cheese.
- Carrot: Sliced for teeth and cut into pieces for the nose. Their warm orange feels cheerfully spooky against the cream.
- Celery sticks or breadsticks: These form the crossbones and anchor the whole display. Celery is sturdier and always safe for gluten-free needs.
- Fresh parsley or chives: A final whisper of greenery that makes the whole thing feel intentional and finished.
Tired of Takeout? 🥡
Get 10 meals you can make faster than delivery arrives. Seriously.
One email. No spam. Unsubscribe anytime.
Instructions
- Prepare your creamy canvas:
- In a medium bowl, combine the softened cream cheese, sour cream, garlic powder, lemon juice, salt, and pepper. Mix slowly at first so you don't splash yourself, then work it until it's completely smooth with no streaks of cream cheese visible. Taste it—if it needs more salt or lemon, this is the moment to adjust. You want it to taste genuinely delicious, because people will eat this spread with crackers and vegetables.
- Shape your skull:
- Clear a large serving platter and give yourself space to work. Using a spatula or the back of a spoon, spread the mixture into a rough oval shape—think upside-down egg or human skull. Smooth the surface as much as you can. Don't worry about perfection; a little texture makes it look more artistic and less sterile.
- Add the crossbones:
- Take your celery sticks or breadsticks and arrange them in an X shape beneath the skull's bottom edge. Tuck them gently into or under the cream cheese so they look intentional and anchored. This is your biggest structural moment—get this right and everything else feels stable.
- Place the eyes:
- Position the black olive halves in the upper portion of the skull where eyes naturally go. Press them gently into the cream cheese so they stay put. They should look vaguely menacing but charming—which is harder than it sounds.
- Build the face:
- Arrange carrot slices vertically below the eyes for the nose, pressing gently. Then use red bell pepper strips to form a smile or grimace across the middle of the skull. Add more carrot slices below that for teeth—arrange them in a grin that feels appropriately Halloween-ish. Step back frequently to see what the overall effect looks like.
- Add texture and color:
- Fill in gaps and add visual interest by scattering cucumber rounds, additional carrot pieces, and any remaining vegetables around the skull. Think of these as freckles and details that make the face feel more complete.
- Final garnish and chill:
- If using parsley or chives, scatter a small amount around the base or on top for greenery. Cover loosely with plastic wrap and refrigerate until party time. This keeps everything fresh and helps the vegetables stay crisp.
 Pin It
The best moment came when I made this for my partner's team at their office Halloween party. A normally quiet colleague stood in front of it for a solid minute, then turned to me and said, 'This is the most beautiful thing I've ever eaten.' Sometimes the smallest gestures mean the most, especially when they're served with a side of genuine creativity.
Flavor Combinations That Work
The beauty of this spread is that it's a blank canvas for experimentation. I've tried herbed cream cheese mixed with fresh dill, added crispy bacon bits for a smoky note, and once mixed in roasted garlic for a deeper, mellower flavor. The vegetable arrangement matters less than the foundation—get your spread right, and the rest is just decoration. The garlic and lemon keep everything bright and crave-worthy, preventing that heavy, one-note spread feeling that can happen with plain cream cheese dips.
Making It Your Own
This recipe thrives on personalization. Use whatever vegetables you have on hand—thin zucchini slices, roasted red peppers, cherry tomatoes cut in half, even thinly sliced radishes all work beautifully. The skull is just a suggestion; you could arrange it as bones, a haunted house, or abstract spooky shapes. I've made pirate-themed versions with eye patches and ship decorations. The spread stays the same, but the face tells your story. That's the real magic here.
Serving and Storage Tips
Serve this straight from the fridge on a platter surrounded by crackers, pita chips, breadsticks, and additional vegetable dippers. Have small plates and napkins nearby because people will want to grab pieces, and the spread gets wonderfully messy in the best possible way.
- Keep it refrigerated until serving, then it stays fresh for up to 3 hours at room temperature
- Don't leave it out longer than that or the vegetables start losing their crunch and the cream cheese begins to separate
- Leftover spread keeps for 3 days in an airtight container—use it on crackers, in wraps, or as a vegetable dip long after the party
 Pin It
 This recipe taught me that food doesn't have to be complicated to be memorable. Sometimes the most meaningful dishes are the ones that spark joy, make people laugh, and turn a simple appetizer into a moment everyone remembers.
Recipe Questions & Answers
- → What ingredients create the creamy base?
The creamy base combines softened cream cheese, sour cream, garlic powder, lemon juice, salt, and pepper for a smooth texture and balanced flavor.
- → How are the skull and crossbones shaped?
The cream cheese mixture is molded into an oval shape for the skull, with celery sticks or breadsticks arranged beneath to form the crossbones.
- → Which vegetables decorate the skull features?
Slices of cucumber, red bell pepper strips, black olive halves, and carrot rounds are artfully placed to represent eyes, nose, mouth, and teeth.
- → Is there a gluten-free option available?
Yes, substituting breadsticks with celery sticks ensures the spread remains gluten-free.
- → What serving suggestions enhance this spread?
Serve chilled with assorted crackers, pita chips, or vegetable dippers. Garnishing with fresh parsley or chives adds an herbal touch.